I bet if you asked 100 different gardeners how they started their seeds you would get 100 different answers. The key is to find a method that works for you and your unique growing situation. I do not have a greenhouse so for me the most efficient use of my space is starting seeds in soil blocks. Soil blocks are made by compressing a potting medium into a mold and then using those blocks to start seedlings. These blocks come in many sizes. The size I use for most of my flower starts is a ¾ inch blocker (pictured right)
The benefits of soil blocking are:

Space Efficiency
You can grow a ton of seedlings in a small space. I have (8)- 4ft shelves and depending on the size tray I use I can start up to 1,200 of the ¾ inch soil blocks on each shelf. If I fill all the shelves that will give me 9,600 plant starts.
Environmentally Friendly
I use reusable trays such as windowsill or cafeteria trays that are much more space efficient than plug trays. You can also use/reuse foam trays, such as meat packing trays, but I prefer to make the one-time investment in trays I can pretty much use forever. I use LED shop lights which are 80% more efficient than fluorescent bulbs and I start them in an unheated/uncooled garage which leads to a lot of plant output compared to the space and energy it would take to heat/cool a greenhouse.
Sanity Saving
Soil block trays are much easier to clean than a plug trays. The thought of cleaning all the potting debris from the inside of a plug tray is enough to drive me mad (admittedly not a far drive). Besides, plug trays will only last a season or two unless you buy the sturdy (but incredibly expensive) trays. With the cafeteria trays, I just put them in the bathtub and wash them with hot soapy water. I rinse them and then let them dry in the tub. Once dry I stack them inside my soil mixing tub along with all my other seed-starting materials.
Economical
They are both money and space friendly for all the reasons listed above.
Healthier Seedlings
The roots are allowed to grow at will and are air-pruned avoiding the incidence of root-bound seedlings which makes them much less prone to transplant shock. Because the little rootlets wait at the edge of the soil block, they are ready to grow on quickly once placed in the ground.
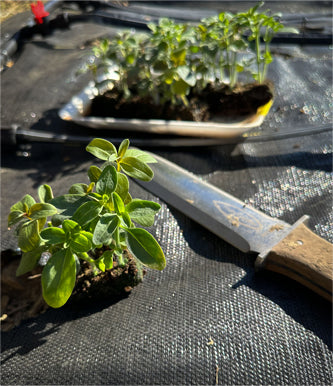
Easier Transplanting
Transplanting is physically easier. The blocks separate easily and just go right into the ground versus plastic flats where it is necessary to pry out each little cell.
Time Saving
While some may argue me on this point, just hear me out. Let’s say I started my 9,600 seedlings in 72 cell flats. That means I would have to make up roughly 133 cell trays. Which means I would have to take the time to fill 133 cell packs, pry out all the 9,600 seedlings, and then wash all the plug trays (because IMHO it would be sacrilege to use then throw out all 133 trays). So, for me, it is easier and quicker to make up 24 trays of soil blocks, start my seedlings, plop them in the ground, and just put the trays in the bathtub to wash. Besides I can only fit 4-plug trays per shelf so I could only grow 2,304 seedlings (about a ¼ of what I can start in soil blocks) and more plants=more flowers=a much happier me!
So have I convinced you yet?? If so, read on to find out how to make these magical blocks.

Before we cover the steps to making the blocks let’s talk about what medium you should use. There are all kinds of homemade recipes out there and I have tried out several of them with success. With the homemade mix, I am usually running out of one ingredient or the other, and it just takes a bit of time to measure and mix so for that reason I buy an organic premade mix. I will put links to all of these in the resources. Just a note that most of these do include peat moss which we are discovering is not very sustainable. You can use coconut coir as a substitute for peat moss. The use of peat moss soon will be banned in the UK and I am hoping this will lead to more environmentally friendly premade mixes as well. You can also google peat-free soil block mix as well since many people are experimenting out there with good results. Now on to making the soil blocks.
Part I: Making the Soil Blocks
Step 1:
I usually start by sifting my medium through my homemade garden sieve pictured here (you can find manufactured ones online). Mine is nothing fancy just some boards with two sheets of overlapped ¼ inch hardware cloth attached to the sides. I like it for the fact that it fits over my wheel barrel. This sorts out some of the larger sticks and stones that may impede root growth in my tiny soil blocks. There is usually not too much that needs sifting out in the type of premade soil I use. To be honest, I have skipped this step before, and the plant babies have grown just fine.

Step 2:
I place the soil mix in a tub and mix in water. The consistency you're aiming for is that of soppy oatmeal. In the beginning, finding the right ratio of water to soil was the hardest part, but after playing with it a few times I kind of got a feel for the proper consistency. If the blocks are too dry, they tend to crumble apart and if too wet they stick to the inside of the blocking mechanism. It doesn't take too long to figure it out. Just add a little water at a time, mix, and assess. If the medium is still too dry add more water, but if too wet just add a little more blocking medium. I just mix it up with gloved hands so I can feel the texture.

Step 3:
I fill up the blocking mechanism by pushing it down into the soil and making circles on the bottom of the tub. I repeat his a few times until I’m sure all the blocks are filled and compressed adequately (this just takes a little practice).

Step 4:
I use a putty knife to scrape off excess from the bottom.

Step 5:
I use a putty knife to scrape off excess from the bottom.
Step 6:
I repeat until the tray is filled

Part II: Seeding the Tray
Step 1:
Gather supplies: labels, pens, seed dishes, and toothpicks. I use a lab labeling system to keep all my supplies organized and to make the process faster when I have multiple trays to label. The lab tape I use is oil, acid, and water-resistant and can withstand extreme temperatures. Ultimately, this means it will not wash off the tray no matter what I do to it. Despite its toughness, when you purposefully remove the tape it lifts magically leaving no sticky residue. Painter's tape is pretty much the same stuff and can be used the same way (but I do find lab tape sticks better). I always use a designated garden pen since they are light, water, and fade-resistant. I made the mistake of using a sharpie one year and unfortunately found out they are not fade-resistant. I also use two ceramic condiment dishes, one for water and one for seeds along with a toothpick to pick up those tiny little rascals.

Step 2:
Put on a good podcast. Admittedly seeding trays takes a bit of time and patience. There are newer soil blocking systems out there to speed up the process for commercial growers which I have and love (you can find them here), but I find the process of seeding rather meditative, especially when I have on a good podcast or some music.

Step 3:
I dip the tip of the toothpick into the water and then pick up a seed. Avoid using plastic dishes since they hold static electricity and you will end up chasing the seed all around while it deftly outmaneuvers you.

Step 4:
To cover or not to cover. If the seed requires light to germinate, I place the seed in the divot at the top of the soil block and firm it into place (good seed-to-soil contact is important for rooting). If the seed requires darkness, I ever so slightly push it into the soil block with the toothpick and then cover the top of the soil blocks with vermiculite. Usually, the seed pack will indicate what the seed requires.
Some helpful tips here:
If you are old like me, you may need a little extra light to see those tiny dark seeds on the dark soil. For light, I use a bright headlamp and find it extremely useful. Yes, you will run the risk of looking a little foolish and blinding other people if you look up at them forgetting you have it on your head. If you need to step away from the tray stick the toothpick in the last block you seeded so you can remember your place, because trust me once the seed is on that block it takes serious investigative skills to find it again. I only seed one type of flower on each tray, because different seeds germinate at different rates (even among the same family). Take feverfew, for example, I once seeded Magic Single and Tetra feverfew on the same tray. The Tetra germinated much faster and had to be moved to the lights sooner which ultimately caused uneven germination for the Magic Single. Also, some varieties within the same family will grow taller, and it's harder to adjust the grow lights to get even coverage for the whole tray. This is just my practice and experience, but everyone's journey is different.
Part III: Germination
Step 1:
Maintain moisture. It is important during the germination process not to let the blocks dry out too much. They should be damp to the touch. I don’t mess with humidity domes and have never experienced poor germination. If you are just waiting for germination, you can mist the blocks with a misting bottle, but I find it most efficient just to pour a bit of water in the tray for them to soak up and pour off any excess. I have read some say that doing it that way can cause seed rot/fungus but I have not encountered this.

A little note here on "dampening off". "Dampening off" is a disease caused by a fungus or bacteria that cause the seedling to not germinate or abort after sprouting. It is called "dampening off" because the bacteria and fungus that cause the disease thrive in cool and wet conditions. To avoid this happening make sure you are using a good quality potting medium and not garden soil, keep the soil temperature within germination range by using a heating mat during germination, and clean all your trays and seeding utensils thoroughly. Please see the resources at the end for more information.

Step 2:
Give them the proper temperature and bottom heat with a designated germination heat mat. Seed packets will usually tell you the ideal temperature range for that seed to germinate. Some flower seeds are not as picky and will generally germinate at a wide range of temperatures, but some I have found are very picky and need precisely what the pack says without a degree change in either direction. For these cases, I use a temperature probe that I gently insert between the soil blocks. Some temperature probes just monitor the temperature and that is all, while others allow you to plug your heating mat into them and set a range of temps. This causes the heat mat to turn on and off based on the range you have set. I have noticed that when I do not use bottom heat I generally do not end up with uniform germination. In this picture, you can see the ambient temperature in the garage is 58.8 while the soil temp of the blocks is 68.3 due to the heating mat.

Step 3:
Watch closely for signs of germination and once 50% or greater have germinated move them under the lights. Any fluorescent/LED shop lights will do if you are just starting seeds and plan to move them out to the garden, but if you plan to grow to the point of flowering/ fruiting then you will need to have full spectrum lights. You can go down a rabbit hole when researching lights for seedlings. I can only speak from my experience, but I have found that the standard LED’s from the local big box store do the trick (almost) as well as my more expensive “grow lights”. What will NOT work is putting them in front of a window, doing this leads to leggy seedlings that are using up all of their energy bending & stretching to find the sun. One important thing to note is that the light source needs to be incredibly close to the seedlings (like 2 inches close). I was stunned at this, but the fact is that the lights we use are nowhere near the strength of the sun and dissipate quickly the further away they are placed. To avoid stretched & leggy seedlings it's important to place them very close to the light source and move this light source up as the plants grow taller. The other thing to note here is "day length". Plants need periods of daylight and darkness to develop properly, but again because artificial lights are not as strong as the sun, they need a little extra "daylight" time. A pretty good rule of thumb is 16 hours of daylight under artificial light. I find it super helpful to use a cheap timer that turns my lights on and off since I'm just too prone to forget.

Some helpful tips here:
If you are old like me, you may need a little extra light to see those tiny dark seeds on the dark soil. For light, I use a bright headlamp and find it extremely useful. Yes, you will run the risk of looking a little foolish and blinding other people if you look up at them forgetting you have it on your head. If you need to step away from the tray stick the toothpick in the last block you seeded so you can remember your place, because trust me once the seed is on that block it takes serious investigative skills to find it again. I only seed one type of flower on each tray, because different seeds germinate at different rates (even among the same family). Take feverfew, for example, I once seeded Magic Single and Tetra feverfew on the same tray. The Tetra germinated much faster and had to be moved to the lights sooner which ultimately caused uneven germination for the Magic Single. Also, some varieties within the same family will grow taller, and it's harder to adjust the grow lights to get even coverage for the whole tray. This is just my practice and experience, but everyone's journey is different.
Part IV: Growing On
Step 1:
As discussed in the previous section proper lighting is important to prevent weak seedlings. Continue to move the light up with a pulley (see picture) as the seedlings grow to keep the light about 2 inches above the canopy (see picture).

Step 2:
As the plants grow, they will need to be watered (usually) daily. I do this by pouring water into the bottom of the tray and leaving it for a few minutes (see picture). Whatever excess is not absorbed I pour off the tray into a bucket that I empty daily (sitting water can attract unwanted insects). Your environmental conditions will affect how often you need to water your seedlings. Sometimes in the humidity of the summer, I can skip a day of watering because the blocks do not dry out. Once seedlings are established, I do allow them to dry out a little bit in between waterings. This helps prevent algae build up on the blocks. But if you live in an arid climate you may need to water more than once a day. For the most part, I only visit my seeds twice daily. Once early in the morning when they get watered and once in the evening to see how the day has treated them.
Note: Whatever you use for your tray make sure the sides are low enough that you can easily pour the water off the tray without dumping the soil blocks.

Step 3:
Nutrition becomes more important once the seedlings have germinated. The soil medium I use has some nutrients in it but once the seedlings develop their first true set of leaves I begin to feed them with fish emulsion every once or twice a week. I just mix it up according to the instructions on the label and use it in my watering can. If you start to notice discoloring of the leaves (yellowing or purplish appearance) this may be due to a nutritional deficiency.

Step 4:
Give them a light brushing with your hand each day as they start to get older. This will help simulate the wind and signals them to toughen up their stems a little.

Part VI: Planting Out
Once the seedlings have reached about 3 inches tall they are ready to be moved out to the field but first, they must be toughened up a bit. Up to this point, the seedlings have been coddled and have not been exposed to common environmental factors like they are in the field (winds, rain, heat/cold). To get used to these factors you can place them in a shaded spot outside starting with a few hours the first day and working them up to longer periods each day up to about a week. This should give them the exposure they need to reinforce their outer cuticle and basically “toughen up”. Just remember to check the forecast first since an unexpected hard rain can obliterate your soil blocks.
Honestly, sometimes I just don’t have the time to do this, and upon occasion, I will skip this step if I know that the weather is mild and the seedlings are healthy and hearty. Often, I will just cover them with a bit of shade cloth or clip some frost cloth to the tops of my garden hoops to let them get acclimated. However, I do so at my peril understanding that they could fail due to transplant shock if the weather is too much for them. Use your best judgment here, but it's always the safest option to harden them off first.
Part VI: Planting Out
Step 1:
Your soil should be prepared ahead of time. You will want to plant into loose well-draining soil that is free of sticks and other debris so that the roots can make good soil contact (this is where they get all their nutrition). To make sure your soil nutrition is adequate you can send a soil sample once or twice a year to your state university at no cost. Make sure to do this well ahead of time since they may recommend that you add things to your soil if there are deficiencies. Let them know if you are an organic grower so they can recommend organic amendments. For more information on how to collect a soil sample and how to send it off check out your state university’s website or contact your local agricultural extension agent. It is not recommended to just blindly add amendments to your soil since this can lead to damaging runoff that has a major environmental impact. Additionally, adding amendments without knowing what your soil levels are can negatively impact your new plantings.
Step 2:
Take note of the forecast. The new plantings will be very sensitive to weather extremes. If luck has it, I try to plant the day before a good rain. There is just no way to control the weather so if you know conditions aren't going to be ideal anytime soon then try to modify the environment as much as possible. Like adding shade cloth if it is going to be scorching or frost cloth if you feel it is too chilly.
Step 3:
Put the water to them!! Yes, you can overwater plants once they are established, but in the beginning (the first week or so) you should NOT let the soil get dry. They are often going through a bit of shock and need the additional water to help establish their new root system. Once they are established you can water them as needed (based on the plant's characteristics and the dryness of the soil).
Wrapping Up
ASo once those babies are in the ground it's watch and wait. At this point I keep them watered and onitor them for pests. If all goes well, you should be rewarded with some adorable blooms!!
Credit and Resources
Books
Coleman, E. (2018). The New Organic Grower: A Master's Manual of Tools and Techniques for the Home and Market Gardener, 3rd Edition.
United States: Chelsea Green Publishing.
Chase, J. L. H., & Pouncy, A. J. (1955). Soil Block Gardening. Faber & Faber.
Websites and Supplies
Lisa Mason Ziegler from the Gardener’s Workshop is the queen of soil blocking. I learned my technique from her. She has amazing and thorough resources including an online course that is incredibly helpful. You can also find everything you need to get started in her shop for a very reasonable price. Here is the link to her guide for everything soil blocking.
Johnny’s Select Seed has a good resource here which includes Eliot Coleman's soil-blocking recipe which you can find here. They also sell a variety of soil-blocking equipment including their own soil block mix.
Here is a link to the Vermont Compost Company which has the Fort Vee mix that I use for my soil blocks.
Helpful Guides to Understand Grow Lights
The University of New Hampshire "Growing Seedlings Under Lights" Facts Sheet
Johnny's Selected Seeds "Guide to Choosing a Grow Light"
Good Article on “Dampening Off”
The University of Minnesota Extension "How to Prevent Seedling Dampening Off"